Disco II CDL Difflock Linkage
(View Product)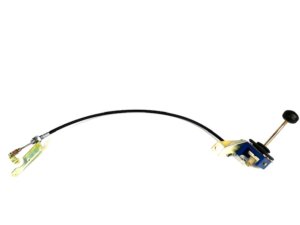
-
Technical
There are other types of centre diff lock units available but most are electric, we favour this option as they are simple and cable operated like the factory parts, easy to fit and there is nothing to go wrong. We do not supply parts for the diff lock light, you will need to wire this up if required.
-
Installation
The OEM CDL kit replaces the existing D2 Transfer Box gear selector mechanism with one with an additional cable run to the top of the transfer box mechanism, where it engages the CDL spigot.
You need a gearbox with a spigot to begin with, otherwise it's a non-starter. Please ensure your vehicle is suitable, please read the information above to find out whether your gearbox is suitable, and what to order if it isn't.
You'll also need a nylock nut, an M8; a washer to match; and 13 rivets - I used 4.7x17mm pop rivets. Apart from the usual hand tools, you may also need something which will cut laminated steel plate, and you'll need a drill, and of course a rivet gun.
1) Unclip the gearstick gaiters. Unscrew both gearknobs. Remove the top half of the main gearstick by removing the bolt at the join completely and sliding off.
2) Remove the rubber cover from the gearstick area. Unclip the handbrake gaiter from the top, and peel it forwards. Remove the plastic fascia around the window switches and unscrew the switchplate. Twist it and push it into the console.
3) Remove the pin which connects the handbrake to the handbrake cable. Remove 2 screws from inside the cubby box, and 2 screws from just in front of the transfer box lever. You can now start to lift the whole binnacle out. As you do so, disconnect the cigarette lighter connection from underneath, and remove the bulb holder.
4) Lift out the foam around the gear lever area. Unscrew the bracket at the front of the area. Peel the carpet back and drill out the 13 or 14 rivets (depending on which plate you have) from the steel plate around the gear levers. Remove this upwards through the console.
5) Unscrew the existing Transfer Box shift mechanism from the steel plate. Match the plate up to the new mechanism. Depending on your plate, you may need to enlarge the aperture for the gearstick. This can be done by chain drilling and/or sawing. Leave the new mechanism separate for now.
6) Look down into the large hole you've just opened up, to find the CDL spigot on the top of the transfer box. It's about a foot down, and is a threaded shaft with an oval profile at the base, in the middle of a triangle of three bolts. Undo the frontmost and left-hand bolts of the three.
7) Take the lever end of the new mechanism and force it down towards the CDL spigot. The mounting bracket will attach to the top of the transfer box using the two bolts you just removed. Screw these bolts in loosely. The tail of the cable should be running forwards.
8 ) Match up the keyed loop at the end of the cable to the CDL spigot. Make sure you have it the right way up Using your M8 Nylock nut, and a washer, bolt it down to the spigot.
9) Clunk the new gearstick from side to side to see if the mechanism engages. If you do this with the ignition on, you can see the CDL light lighting up when it's engaged. If it needs adjusting, you can adjust the two nuts either side of the mounting bracket, on the cable which is now mounted to the top of the transfer box casing. Make sure these are tight before you go any further.
10) Line up the new lever with roughly the space it's going to go in when you bolt the whole lot back together. You may have to do some shoving to get it in place, as the new cable will get in the way. Put the steel plate back into its hole and get a couple of rivets in to hold it in place. Force the new gearstick into its rightful place and bolt it back to the plate.
11) Rivet the plate back in. You'll only be able to get 13 rivets in, as the front right rivet will be blocked off by the new cable mechanism.
After that, refitting is the reverse of removal.
To finish off the job...
1) Disconnect the battery. Unscrew the four hex screws in the glove box hinges. Reach round the side of the glove box with each hand and pull the closing mechanism upwards. Slide the glove box out
2) Pull out the 3 push-studs on the black cardboard panel underneath the glovebox, and undo the screw stud at the back. Remove the panel.
3) Near the outer side of the gap behind the glove box, you will see 2 or 3 ECUs, depending on whether you have ACE, I think. The SLABS ECU is the centre of the three, or the outside of the two. It has 5 black connector blocks underneath. Remove the centre block of the five from underneath the ECU.
4) Look for the black & blue wire running to pin 9 of the connector block, which is the central pin on the lower row, i.e. the row furthest from the retaining clips. At this point, make sure you have the right connector, and the right pin!
5) Cut this black & blue wire & tape off the ends. (Give enough space to solder it back together if you find out you have cut the wrong one...) Reconnect the connector.
Replace the panel and the glovebox.
Reconnect the battery.
Please note : This is not needed for 2003 on (facelift) models as the ECU has been reprogrammed to take care of NOT disabling traction control/ABS when CDL in engaged, when ignition is switched on.
To test:
Engage the CDL and start the car up. The CDL light should be lit, but the ABS/TC lights should not be lit up.
This is correct - it means that the SLABS ECU is not disabling ABS/TC when you start the car up with the diff lock engaged
We would like to express our thanks to Mr David French of Surrey for providing these informative installation instructions for us