ZF4HP22
(View Product)
-
FAQs
What oil temperature should my ZF be running at ?
There is a good guide to oil temps here
How should I setup the kickdown cable ?
When setting up a ZF hydraulic kickdown cable, it should be set so you take up all the slack at about ¼ to 1/3 throttle and you feel the ‘click’ at the end of the stroke as you get to full throttle, once estimated, you can fine tune, if it shifts too early and quite soft, tighten the cable . If it shifts hard and late then the cable is too tight, slacken it off.
My Autobox is now only able to select reverse. Why?
Your A clutch (forward drive) has failed and you will require a replacment autobox.
I have just removed the LT230 from my ZF autobox and the output shaft seems very loose, is this normal ?
yes, there is no rear bearing as the shaft is supported in the transfer case input gear.
I have just fitted a rebuilt ZF gearbox but the gear shifting speeds is nothing like it used to be. I have to rev the engine really hard to make it change up. Why?
Check the setting of the kick down cable, if it is too tight the gearbox will think you have more throttle applied than is the case. Check and adjust the gearbox accordingly. As a guide the looser the cable, the earlier it will shift, visa versa the tighter the cable, the later it will shift.
I am just fitting an autobox and want to check the flexplate stacking height, whats the best way to do this ?
You need to check 2 dimentions, measure from the face that the bellhousing fits to on the engine to the rear face of the flexplate, call this dim 'A', then stand the autobox up vertically with the bellhousing up and fitted in place, then measure from the bellhousing face to the converter feet that the flexplate fits to, call this dim 'B' . Dim B should be 1 or 2mm more than dim A, this means that when you put the converter bolts in you will pull the converter forward by 1 or 2mm, this dimention is important as it both confirms the converter is fitted on the pump correctly and also checks the stacking height of the crank parts, if this difference is more than 3mm you risk pulling the converter forward too far and this will reduce oil pump engagement which can lead to failure.
What oil should I use in my Auto ZFHP22?
We recommend you use ATF Dexron 2/3.
What is the oil capacity of the ZF 4HP22 ?
Oil change approx 5 LitresDry fill approx 9 Litres
I have just fitted a reconditioned ZF autobox. I have filled the box with the correct amount of oil but have no drive at all, forward or reverse. Why?
The first thing to do is to remove the oil cooler pipe from the bottom of the gearbox (put a container under the open end to catch the oil) and start the engine. You should get a good flow of oil. If not the pump has been broken during installation and will need replacing/rebuilding. The torque convertor must be fitted to the gearbox, located correctly on the pump and locked into position before the gearbox is offered to the engine, otherwise damage will occur to the pump, resulting in no oil flow and subsequent to other parts of the autobox.
When I start my Automatic Range Rover in the mornings it takes a while to engage drive, it has not always done this. This has become worse in the cold weather. Why?
It sounds like you need to change the filter. In the cold weather, i.e when the oil is cold and more viscous, if the filter is partially blocked it will take some time for the pump to draw oil through it. Once the oil becomes warm it flows more freely and can pass through the filter more easily. Hence the problem only occurs when the oil is cold. To remedy this problem your filter needs to be changed. This should be done sooner rather later to reduce the possibility of damage to the autobox, by the clutches 'slipping' during this slow engagement.
I have a 4sp ZF, when I select "D" the vehicle won't move, when I select "1" the vehicle moves off. I can then select "D" and continue to drive normally. If I stop I have to start in first again. Why?
A sprag clutch has "inverted" and will need replacing. No further damage will occur if you continue to drive but you will need to select "1" every time to start moving. A rebuild is required to correct this.
I have a 4 speed ZF Auto and it sticks in first gear in the morning or when cold and is reluctant to change up from 1st gear. Once the gearbox has warmed up it shifts normally. Why?
The governor valve is sticking, which can be caused by contamination. i.e. clutch plates or other parts disintegrating. The fine debris finds its way past the filter and tends to accumulate in the governor, causing it to stick. A temporary solution is to remove and clean the governor. The problem will often recur as debris from damaged parts continues to build up in the governor. If the problem continues after cleaning the governor then it may be necessary it replace your Autobox.We have noticed many customers reporting this fault starting a few days after an oil and filter change and after researching this using our experience and the expertise of others in the trade we have come to the conclusion that as ATF oil is a detergent type oil, when the oil is changed this will dislodge and stir up settled debris in the autobox which in turn jams the governor valve. In light of this although it sounds controversial it is debateable if changing the oil and filter is a good idea, some say if the box it going to fail it will fail if the oil is good or bad and their advice is leave it alone. I am still undecided but the truth is I get a lot of calls from customers thinking they are looking after the autobox by servicing it and a few days later this fault occurs.
Whats the easiest way to shift between high and low with an autobox ?
Engine running, put in drive and come off the pedals so the car is rolling at walking pace, move the gear shifter to Neutral and before you come to a standstill shift the hi/lo lever to high or low with a quick sharp push, once engaged move the gear shifter to Drive and continue.
I have a range rover classic with V8 and ZF autobox and I want to remove the V8 and Fit a 300 TDi, can I do this?
There are 3 ways to do this,
- fit the whole stock 300 disco auto setup complete, this is the easiest option.
- get the 300 auto backplate, flexplate, starter ring gear, converter and bellhousing and fit these to the V8 ZF, be careful not to break the pump.
- contact www.mdengineering.co.uk and buy a adapter fit to fit the V8 ZF to the 300, this allows you to use the bigger V8 converter which is desirable over the smaller 300 one.
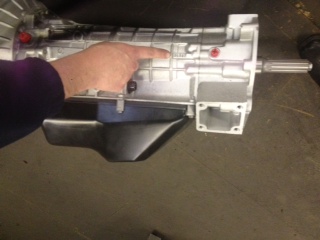
Where is the Ashcroft Rebuilt number located on the autobox ?
Please see this photo to show the location of our RB number. It will be one letter and four numbers. i.e. D4567
-
Technical
A common problem with all ZF 4HP22/24 boxes is the failure of the one way "sprag" clutch. Once the cams in this one way sprag clutch "flip" the unit will slip both ways resulting in the vehicle only pulling off with the shifter in position "1" not "D" and driving OK when shifted up to position 2,3 and D until you stop then you need to pull it back to "1" to start off again. It is not feasible to change this unit in each rebuild as this one part is approx £400. By disassembling the "sealed unit" we were able to examine the profile of the cams and understand how they work, from here the challenge was to find another cam from another type of autobox that would fit and had the correct profile to make the unit stronger by not allowing the cams to flip. After quite a lot of searching we found one, "re-cammed" some of these clutches and thoroughly tested them, we have not had one fail since. This is an example of how we are able to use our engineering background to understand a problem and cost effectively make the unit stronger without having to raise our prices.
We have also invested £20,000 in a "Hydra-Test" machine. This machine allows us to do 2 things. Firstly once the valve body has been rebuilt we are able to fit it to a plate on the test rig and run the valve body through its cycle with 45 deg pre-heated oil to simulate as close as we can get to "real world conditions" The hydraulic valve bodies are run through manually by winding a valve to simulate the governor increasing in speed and various pressure gauges are monitored to see that the valve body is applying the correct clutches at the correct pressures. When testing the electronic ZF valve bodies once the solenoids are all tested this cycling procedure can initially be run through manually to check all is well then the computer can run up to 100 full run cycles going from 1st, 2nd, 3rd, 4th and lock up down to 1st again to ensure no valve are sticking and the solenoids are not failing when hot and working hard.
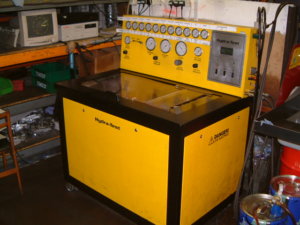
As part of the test procedure we also fit a test plate to the autobox in place of the valve body and apply heated oil at pressure to check we have no leakage or pressure drop on any of the clutch packs.
This machine has enabled us to improve the quality of our boxes by identifying any potential faults or problems before the box reaches the customer.
Please see a video below of a ZF4HP22 Electronic Valve Body being tested:
[embed]https://www.youtube.com/shorts/JHQ2Y_jAp9U[/embed]
-
Installation
Check List for fitting ZF Autobox
Please note that a good 50% of our "warranty returns" are due to two basic installation errors.
1) Debris and contamination in the oil cooler and oil cooler lines, even if you have flushed them out this is no guarantee they are clean, if the old box has suffered a bad failure you would be wise to replace these.
2) Broken oil pump, by not fitting the torque converter correctly, read below.
Assembly
Check engine to bellhousing and Autobox to transfer case dowels are all fitted.
It is very important that you locate and install your torque converter correctly. One of the most common causes of failure is the torque converter not being located correctly onto the pump before fitting causing the pump to be broken on start up.
To avoid this we would suggest that you stand the autobox upright and lower the torque converter into the bellhousing.
When the torque converter has fully located onto the pump it is essential to then measure the distance from the bellhousing front face to the torque converter feet ( also known as the flange that the flexplate is bolted to).
Once the torque converter is inserted and checked make sure it does not fall forward when offering the autobox up to the engine. Do not be tempted to pull the gearbox into position with the bellhousing bolts, it should fully locate on the engine with no gap between the bellhousing and engine block.
With the autobox fitted to the engine, check that the converter will rotate freely and has a small amount (about 2mm) of end float. Bolt the converter to the flex plate using loctite or similar on the thread of the bolts.
Ensure the breather vents well away from the exhaust.
Oil Fill
Always use a good quality oil, preferably a Dextron III or similar. Put the transfer case in neutral and fill. Start the engine, the oil level will drop immediately, top back up straight away. Move the shifter lever up and down through the gears slowly whilst checking the oil level and topping up as required. Once the level has stabilised, put the transfer case in gear and the unit should now be picking up drive, this is indicated by the engine revs dropping when put in Drive.
Set up
If the vehicle is a Disco I or Range Rover Classic under no circumstances drive with the kickdown cable disconnected, as this will cause premature autobox failure.
Ensure that the shift assembly is set correctly and full travel of the shifter and engagement of all gears is positive, partial shift will cause premature autobox failure.
If the vehicle is a Disco I or Range Rover Classic you may want to adjust the kickdown cable if you want to fine tune the shift pattern, the looser the cable the softer and earlier the shifts, the tighter the cable, the harder and later the shifts.
Torque Converter Depth Table
The box code is the last 3 digits of the second number down on the name plate on the left hand side of the autobox.
Box Code Depth in mm Box Code Depth in mm
061 22 747 27
064 22 748 18
065 27 757 27
332 51 759 27
593 51 763 83
699 51 764 27
631 51 765 27
727 27 766 96*
728 83 767 27
740 51 768 83
741 51 769 83
742 51 773 96*
744 18
*Note this is the depth for the standard converter.
If fitting our HD Td5 Converter please note the following instructions: -
The depth is 73.
The stock TD5 converter has 3 bolts, the new one has 4; the 4 bolts sit in a different place and it’s a little harder to access the new bolts. We can supply a couple of parts to assist you, see related parts below and you will also need a ratchet spanner to fit the 4 converter bolts but to hold the bolts in place and create friction for the ratchet to click you will need to drill a hole in the bellhousing and use some long nose pliers to hold the bolt in place whilst you tighten it with the spanner through the normal lower access hole. There is a link on our website to a template so you know where to drill the hole.
The two tools you may require are:
1) 28mm dia hole saw, available on our website
2) 13mm ratchet spanner, available on our website
Please note this is only recommended on a tuned TD5 engine. If you put this on a stock TD5 engine it will be detrimental as the engine will not have enough power to get up to enough revs for the turbo to start working due to the lower stall speed, this results in the engine 'bogging down' at say 2000 rpm and very poor acceleration.
